Chocolate Mint Slice Bars
Highlighted under: Oven-Fresh Treats
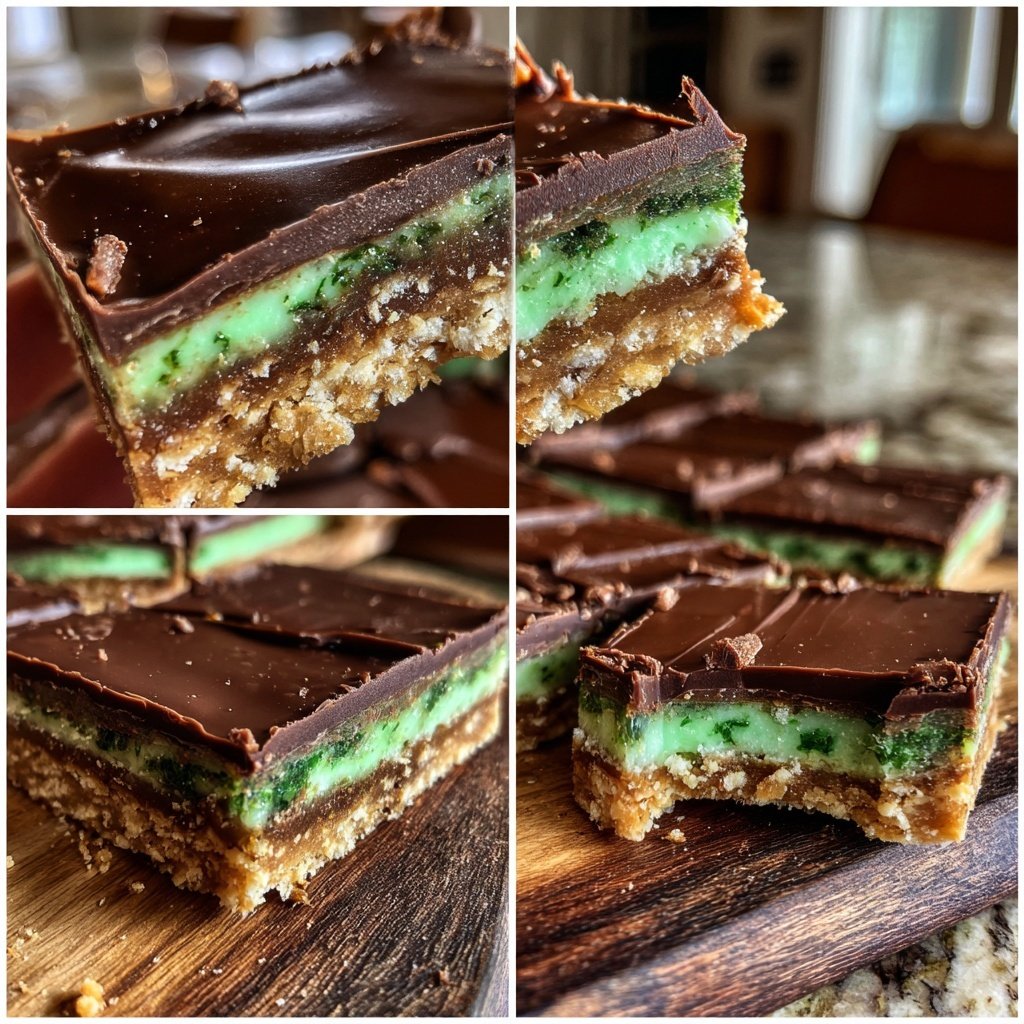
When it comes to sweet treats, one of my personal favorites is definitely chocolate mint slice bars. I absolutely love the harmony of rich chocolate and refreshing mint, which comes together beautifully in this no-bake dessert. It’s so easy to prepare and makes for a perfect snack or a special occasion treat. Plus, the combination of creamy layers topped with a smooth chocolate finish always leaves a lasting impression. I can guarantee that once you try these bars, they will quickly become a go-to recipe for any gathering.
Creating these Chocolate Mint Slice Bars is a delightful experience that never fails to impress my friends and family. I remember the first time I made them, and everyone couldn't get enough of the minty chocolate goodness. The secret lies in using high-quality dark chocolate and real peppermint extract, which truly elevate the flavor.
To ensure the bars have a perfect texture, it's vital to allow each layer to set properly in the refrigerator before adding the next. This step is what gives them that lovely, clean cut when sliced, making them not only delicious but also visually appealing on the dessert table.
Why You Will Love These Bars
- Rich chocolate flavor paired with refreshing mint
- No-bake recipe that’s quick and easy to prepare
- Perfectly layered for an elegant presentation
Crafting the Perfect Base
The base layer of your chocolate mint slice bars is essential for creating a balanced texture. Using crushed digestive biscuits not only provides a pleasant crunch but also introduces a slight sweetness that complements the chocolate and mint. Make sure to press the mixture firmly into the baking dish; this ensures a sturdy base that won’t crumble when you slice it. If you find that your base is too crumbly, you can add a touch more melted butter to bind it together beautifully.
When combining the cocoa powder with the biscuit crumbs, be sure to sift the cocoa first. This will prevent any lumps from forming and help it mix more evenly. If you want an even richer flavor, consider using dark cocoa powder instead of regular unsweetened cocoa. It intensifies the chocolatey taste and enhances the overall experience of these bars.
The Mint Filling: A Delightful Twist
Creating the mint filling is what brings this dessert to life. The peppermint extract is crucial; it delivers that refreshing flavor that contrasts wonderfully with the chocolate. Be cautious with the amount, as too much can overpower the other flavors. I recommend starting with less and adjusting according to your taste preference. The optional green food coloring can be an exciting addition for festive occasions; just a drop or two will make your filling visually appealing without altering the taste.
If you're looking to make a vegan version, substitute the milk with almond milk or coconut milk, and use a plant-based butter alternative. This will still provide the creamy texture needed for the filling while keeping it enjoyable for those with dietary restrictions. The mixture should be thick yet spreadable—if it’s too runny, consider adding a little more powdered sugar until you achieve the right consistency.
Finishing Touches with Chocolate
For the chocolate topping, it’s important to melt the chocolate and coconut oil together gently to avoid burning. Using a microwave in short bursts or a double boiler prevents overheating. Stir the mixture until glossy and smooth. If you notice any small bits of chocolate remaining, continue stirring off the heat until melted; this ensures a flawless finish. If you prefer a sweeter topping, you can mix in a tablespoon of maple syrup or honey while melting the chocolate.
Once the chocolate is spread over the mint layer, make sure to tap the dish gently on the counter. This helps to remove any air bubbles and ensures that the chocolate adheres well to the mint layer beneath. For an elegant finish, you could also sprinkle a small amount of sea salt on top before it sets; this adds a delightful contrast to the sweet and creamy layers below.
Ingredients
Base Layer
- 2 cups crushed digestive biscuits
- 1 cup unsweetened cocoa powder
- 1/2 cup unsalted butter, melted
Mint Filling
- 1 cup powdered sugar
- 2 tablespoons milk
- 1 teaspoon peppermint extract
- Green food coloring (optional)
Chocolate Topping
- 200g dark chocolate, chopped
- 2 tablespoons coconut oil

Instructions
Prepare the Base
In a mixing bowl, combine crushed digestive biscuits and cocoa powder. Add the melted butter and mix until well combined. Press the mixture firmly into the bottom of a lined 9x9-inch baking dish.
Make the Mint Filling
In another bowl, whisk together the powdered sugar, milk, peppermint extract, and food coloring if using. Spread the mint filling evenly over the base layer and refrigerate for about 15 minutes.
Add the Chocolate Topping
Melt dark chocolate and coconut oil together in a microwave or double boiler, stirring until smooth. Pour the melted chocolate over the mint layer, spreading it evenly. Return the bars to the fridge and let set for at least 30 minutes.
Slice and Serve
Once set, remove the bars from the dish using the parchment paper. Cut into squares or bars and serve chilled. Enjoy!
Pro Tips
- For an extra layer of flavor, consider adding chopped mint leaves to the filling mixture or using flavored chocolate for the topping.
Storing & Serving Tips
To keep your chocolate mint slice bars fresh, store them in an airtight container in the refrigerator. They can last up to a week, but I assure you, they won’t last that long! If you want to prepare ahead, consider making these bars a day or two in advance. They actually taste even better when the flavors have had time to meld in the fridge.
When it’s time to serve, let the bars sit at room temperature for a few minutes before slicing. This makes it easier to cut clean squares. For a touch of elegance, serve with a dollop of whipped cream or a scoop of vanilla ice cream on the side—this adds an indulgent contrast to the minty chocolate flavor.
Delicious Variations
Feel free to experiment with the recipe! For an added crunch, try mixing in chopped nuts like walnuts or pecans into the base. This will not only enhance the texture but also add a nutty flavor that pairs well with chocolate and mint. You can also substitute the peppermint extract with orange extract for a lively twist; this creates a completely different yet delightful flavor profile.
If you love a more intense chocolate experience, consider adding chocolate chips to the mint filling. This will give you pockets of melted chocolate as you bite into the bars, enhancing the overall decadence. For an added visual appeal, you can drizzle some white chocolate over the top once the dark chocolate has set.
Questions About Recipes
→ Can I use a different type of cookie for the base?
Yes! You can use graham crackers or chocolate wafers for a different flavor.
→ How long do these bars last in the fridge?
They can last up to a week in the refrigerator if stored in an airtight container.
→ Can I make these bars vegan?
Absolutely! Replace the butter with a vegan alternative and use dairy-free chocolate.
→ Can I freeze the bars?
Yes, these bars freeze well. Just wrap them tightly and they can be stored for up to 2 months.
Chocolate Mint Slice Bars
What You'll Need
Base Layer
- 2 cups crushed digestive biscuits
- 1 cup unsweetened cocoa powder
- 1/2 cup unsalted butter, melted
Mint Filling
- 1 cup powdered sugar
- 2 tablespoons milk
- 1 teaspoon peppermint extract
- Green food coloring (optional)
Chocolate Topping
- 200g dark chocolate, chopped
- 2 tablespoons coconut oil
How-To Steps
In a mixing bowl, combine crushed digestive biscuits and cocoa powder. Add the melted butter and mix until well combined. Press the mixture firmly into the bottom of a lined 9x9-inch baking dish.
In another bowl, whisk together the powdered sugar, milk, peppermint extract, and food coloring if using. Spread the mint filling evenly over the base layer and refrigerate for about 15 minutes.
Melt dark chocolate and coconut oil together in a microwave or double boiler, stirring until smooth. Pour the melted chocolate over the mint layer, spreading it evenly. Return the bars to the fridge and let set for at least 30 minutes.
Once set, remove the bars from the dish using the parchment paper. Cut into squares or bars and serve chilled. Enjoy!
Extra Tips
- For an extra layer of flavor, consider adding chopped mint leaves to the filling mixture or using flavored chocolate for the topping.
Nutritional Breakdown (Per Serving)
- Calories: 380 kcal
- Total Fat: 26g
- Saturated Fat: 15g
- Cholesterol: 195mg
- Sodium: 85mg
- Total Carbohydrates: 32g
- Dietary Fiber: 3g
- Sugars: 24g
- Protein: 6g